7 Techniques for Building Independence During Orton-Gillingham Lessons
By keeping your focus on promoting independence, it encourages the gradual release of responsibility. This is a developmentally appropriate way to teach. Building independence during Orton-Gillingham lessons shows children they can have a sense of ownership and control over their work. This is meaningful for kids!
Another benefit of building independence is to decrease reliance on you as the teacher or tutor. Your goal is to give your students the tools they can use when they are working independently, in the classroom, or with a teacher who is not knowledgeable about the Orton-Gillingham approach.
People with dyslexia, often come to a reading intervention session having experienced failure and defeat. They are extremely discouraged and beaten down. Dyslexia sufferers often feel that they aren’t capable of completing the tasks asked of them. By carefully scaffolding your instruction and allowing your students to discover independence, you can promote a feeling of success and empowerment.
Building independence during Orton-Gillingham lessons can happen both through your mindset and teaching.

Here are Seven Techniques to Build Independence During Orton-Gillingham Lessons:
Download and print our building independence in OG lessons checklist!
1. Setting up a paper
Show your students how to set up their paper for dictation. Do not number their papers for them. Not only is it empowering, but it is efficient when students know exactly what to do. For older students, this may be a simple matter of modeling or providing instructions and feedback. For younger students, or students with dysgraphia, this may be a gradual release of responsibility where you initially provide students with boxes or lines to help them learn appropriate spacing and boundaries. This will gradually transfer more of the responsibility over to them.
See exactly how I have my students set up their paper. Watch Tips for Dictation!
2. Writing the date
Teach students how to write out the full date. This will help them learn the names of the months, not just the numbers. Again, this is a process that varies by age. For a younger student, having the date written on a sentence strip or a small whiteboard for easy copying is helpful. An older child may be able to copy the date from a predictable location. This has the advantage of helping students learn to spell challenging words and to also recognize them.
3. Cursive handwriting
Model and show students how to read and write in cursive. Slowly increase the expectations for more written work in cursive. Start by asking them only to write their names in cursive. Teach them all the letters and the specific connections for their names. Eventually, they can complete their entire dictation work in cursive.
Learn more about effective handwriting practice! Listen to season 2, episode 12 of the Together in Literacy podcast: Bringing Handwriting Into Our Literacy Instruction.
4. Provide reference tools
One key to building independence during the Orton-Gillingham lesson is to teach students how to use a reference tool and provide them with access to this tool. This may be a reference notebook or a flip chart. This is valuable in teaching them to utilize their learning outside tutoring.
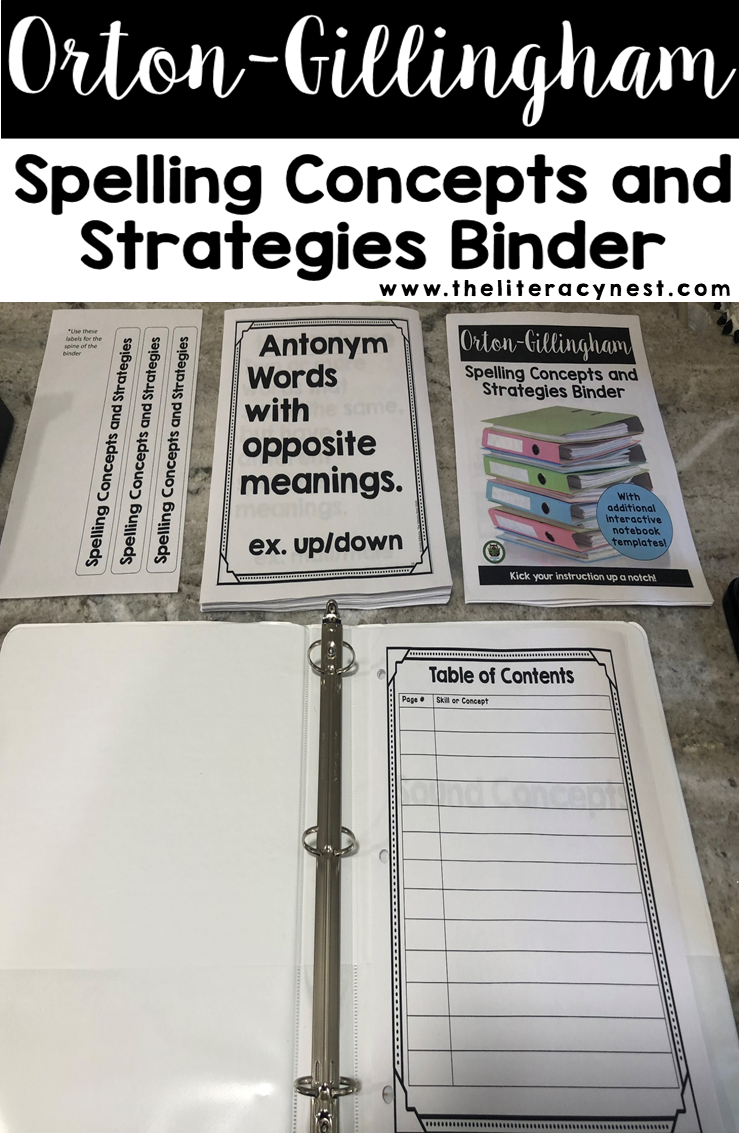
In the Spelling Concepts and Strategies Binder, my students fill in the TOC as shown below. As we add pages to it, they can fill it in with the page numbers. Whenever they need to cross-reference or double-check the meaning of a concept, they know exactly where to go. You may keep an Orton-Gillingham binder with sections for word lists and passages. An additional reference binder at their fingertips is also useful. This will free up space not only on your walls and other binder.
You can see the Spelling Concepts and Strategies Binder in use by watching Spelling Concepts and Strategies Binder for Orton-Gillingham Lesson Plans!
5. Card drills
Providing access to the phonogram drill cards or morpheme cards allows students to check the keywords or meanings themselves. Initially, you may find that you are leaving the new phoneme card out during the entire lesson. As time passes, you can encourage students to flip through the deck to find the card that will help them.
Looking for more ideas for card drills? Read 12 Fresh Ideas for Your Phonogram Card Drills.
6. C.O.P.S.
When it comes time for students to use COPS, use this as a time to observe. This is their checking strategy and something we want them to use outside of tutoring as well. There should be minimal prompting. When a student rereads their writing and fixes any omissions, fixes capitals and punctuation, and lets you know that they are unsure about a particular word, they are making good use of this strategy.
7. Teachable moments
Take advantage of teachable moments. Turn small cleaning tasks into learning opportunities. Putting magnetic letters back into the correct spaces in a case reinforces letter identification and alphabetical order. Categorizing or passing cards back to a teacher or tutor after a game based on a particular sound or strategy can further reinforce learning and promote independence. “Hand me all the word cards that say /ā/, and be sure to read them out loud.”
Points To Remember
If you’ve ever waited for a preschooler to put on their shoes or for someone new to tying their sneakers – trying to tie their sneakers, it comes as no surprise that one of the challenges to having a child do something themselves is that it often takes longer than if you were to do it for them. Just like students need opportunities to build fluency and automaticity with reading and writing, they also need a chance to practice skills like writing the date, using a reference notebook or chart, and utilizing the COPS strategy.
Our patience is key. Students need time to do these things themselves without feeling undue pressure. It can be an intricate dance to keep them focused and on task without hurrying them or interfering with their processing. As tutors, we are always aware of the ticking clock as we try to pace the lesson and cover lots of ground, but that time pressure needn’t be passed on to the student, particularly not when they are taking on additional responsibility.
When we are training our students to do something independently, we must begin by modeling the desired behavior. As students take on more responsibility, it is important to provide generous praise and specific corrective feedback. Be prepared to break multistep directions down into more manageable parts, or take a break from training this skill if students are overwhelmed by the steps.
It is valuable to remember that many of our students struggle with working memory. So, the gradual release of responsibility may move more slowly with students with dyslexia than it would with a student without working memory challenges.
For more on the gradual release of responsibility, listen to season 1, episode 10 of the Together in Literacy podcast!
It can be easier and faster to do too much for our students, but our goal is long-term independence. It is valuable for you to keep this in mind as we consider if we are doing things for our students that they could be doing themselves. The benefits of building independence are not only leaving the child with better skills for functioning independently and better self-esteem and self-confidence but also ultimately more efficient lessons that allow for deeper exploration of complex concepts.
Grab the Teach Reading and Spelling Generalizations freebie today!
Are you looking for professional development that will help you better support your students with dyslexia? The Literacy Nest has a membership for that…
Building Readers for Life Academy is a monthly membership program that empowers educators AND families. It dives into structured literacy and strategies for ALL learners. With BRFL Academy, you’ll learn what it takes to help EVERY student become a reader for life.
